

Before you start shouting at me, “passwords are dead”, they aren’t quite, and yes we will be configuring multifactor authentication, but mistakes happen such as misconfigurations where multifactor may not be applied, so we should still be ensuring that strong passwords are being used across our organisation, and it’s important to have knowledge of how passwords are configured in Azure and understand the default policy.
Since October 2021, Azure Active Directory (Azure AD) validation for compliance with password policies also includes a check for known weak passwords and their variants.
NOTE: The Azure AD password policy doesn’t apply to user accounts synchronized from an on-premises AD DS environment using Azure AD Connect unless you enable “CloudPasswordPolicyForPasswordSyncedUsersEnabled”. See this Microsoft documentation for more information.
With Azure AD Password Protection, default global banned password lists are automatically applied to all users in an Azure AD tenant. To support our own business and security needs, we can define entries in a custom banned password list. When users change or reset their passwords, these banned password lists are checked to enforce the use of strong passwords.
To understand the Azure password policy see the table here. Also note that Azure AD password policies cannot not altered.
Something else to touch on here is Azure AD has been renamed EntraID and is currently being migrated to a new portal, so where possible we will be using the new portal at https://entra.microsoft.com/.
There is a fantastic guide by Charbel Nemnom which goes into the topic of EntraID in great detail, so if you are interested in understanding the components of Entra this is a good place to start. The guide is available here.
To start let go to https://entra.microsoft.com/ then from the left-hand menu select “Authentication Methods” > “Password Protection”. We are going to change the default “lockout threshold” to 5, enable the “custom banned password list” and add one entry which is the name of our company, and change the “mode” from audit to forced.
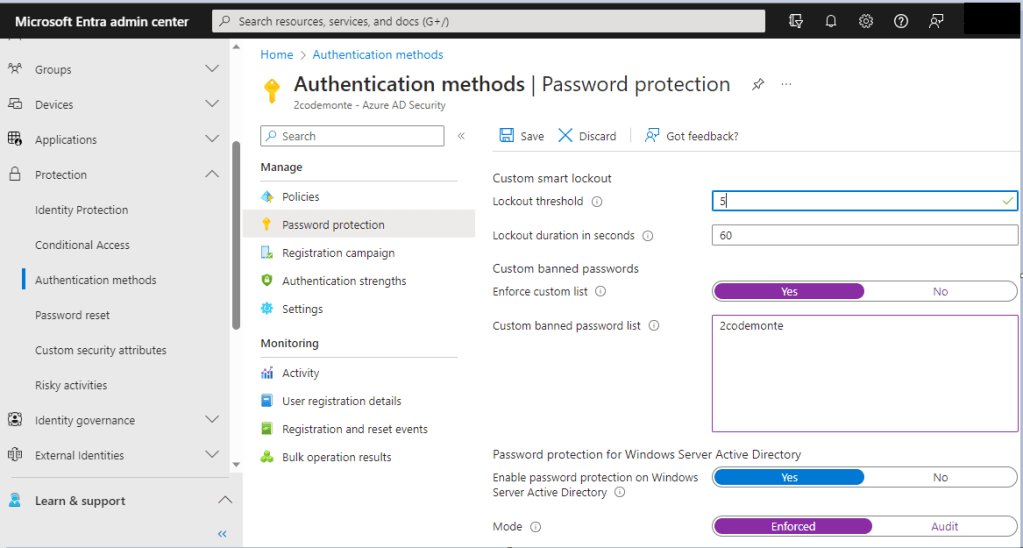
Ensure you click the save button as the changes do not auto save.
With regards to the custom password list, it is limited to 1000 entries, and you don’t want to just fill this up with random words. This is specifically for anything related to your business whether thats a specific department, application, team, or product.
By default, passwords do not expire in Azure AD as this is now considered best practice. However, if for your orgnisation you still enforce password changes every 6 months or annually, you can do so using the following method (although not recommended).
Before you set this there are a few things to be aware of; One, Password expiration notifications are no longer supported in the Microsoft 365 admin center and Microsoft 365 apps, so users will not be notified that passwords are due to expire, and Two, People who only use the Outlook app won’t be forced to reset their Microsoft 365 password until it expires in the cache. This can be several days after the actual expiration date.
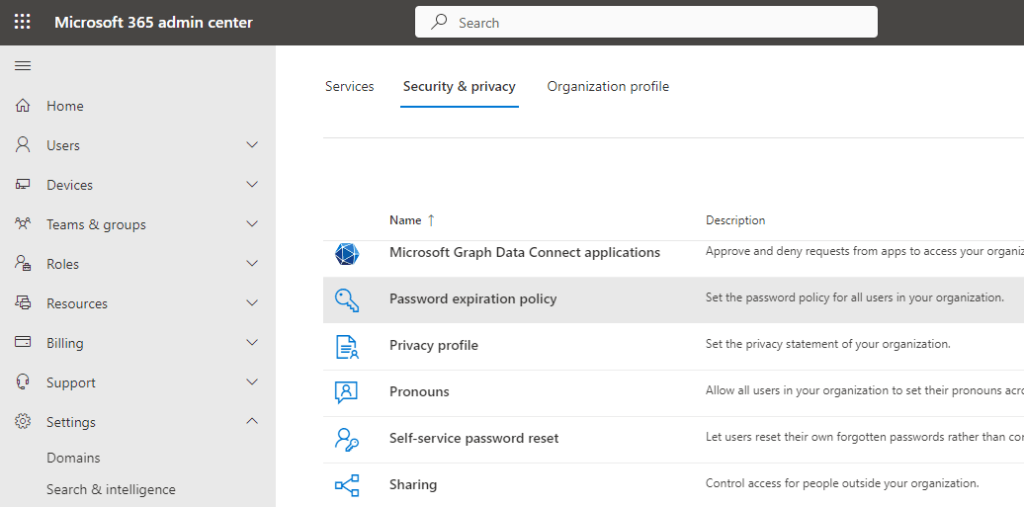
This setting is within the O365 admin panel at https://admin.microsoft.com/ then go to “Settings” > “Password Expiration Policy”.
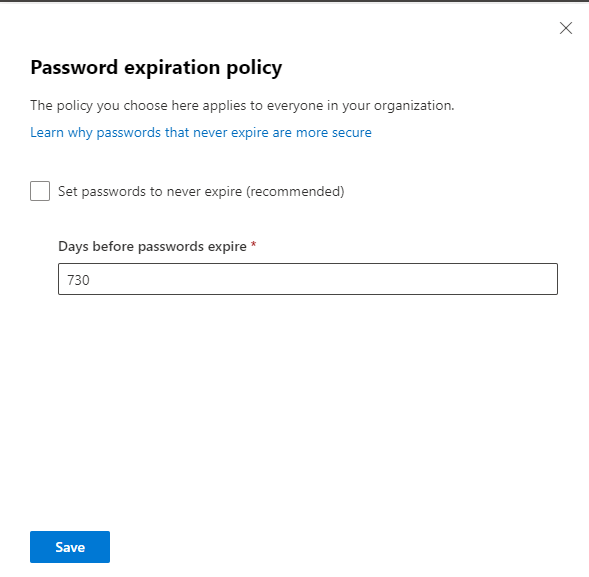
The box is ticked by default, to set an expiration period you need to untick and enter a value as stated.

730 days is the maximum available setting, it’s quite normal for businesses to set this to 365 to force annual password resets.
The other thing you may want to enable is self service password resets (SSPR) for Windows devices.
NOTE: SSPR can also be configured via Intune configuration policies, so if you want to set this via Intune the guide is here.
There are many known settings which may cause issues or conflicts with SSPR, so make sure you look at this section “General Limitations”.
Some of the limitations include.
- Password reset isn’t currently supported from a Remote Desktop or from Hyper-V enhanced sessions.
- This feature doesn’t work for networks with 802.1x network authentication deployed and the option “Perform immediately before user logon”. For networks with 802.1x network authentication deployed, it’s recommended to use machine authentication to enable this feature.
Let’s go back to https://entra.microsoft.com/ then in the left hand menu go to “Protection” > “Password Reset”. On the “Properties” item we can either enable for all users or select groups. We only want our remote users group to be able to reset their own passwords so we add this group by selecting “Selected” from the settings picker, then searching for and selecting the relevant group. You can enable this for all users if you want.
Don’t forget to save this page as it does not auto save.

NOTE: As you can see by the below text, admins are always enabled for SSPR and required to use two authentication methods.

Next we need to specify the second authentication methods we will accept for a password reset.
We need to consider what second authentication methods we will be using for normal logins and/or as we look to move towards conditional access. For example, if we are using only Microsoft Auth app for standard logins, we do not want to allow anything that is considered weaker for password resets such as sms. You can come back and change these settings, but it’s better to have your expectations set and agreed before moving forwards.
NOTE: Via Entra you can now set both SSPR and standard authentication methods within one policy under “Protection” > Authentication Methods”, however as we will be covering multifactor authentication is a subsequent guide we are going to use the policy under “Password Reset” as shown. The SSPR Authentication methods policy will also be depreciated on September the 30th 2024, so these settings will need to be migrated before then. We will show the migration steps in a future guide.
If you have a particularly sensitive group of users you can actually require two additional authentication methods (as per admin accounts), so for high value accounts you could require the authenticator app code, and email verification. Don’t forget to save this page as it does not auto save.

Next is the “Registration” item, where we decide how we will direct users to the registration page. To be able to make use of SSPR users will need to register at the following URL (https://aka.ms/ssprsetup), and here we can get Entra to redirect users to the registration portal during login rather than us having to direct users via other means. We also want users to reconfirm authentication information twice annually by seeting this to 180 days.

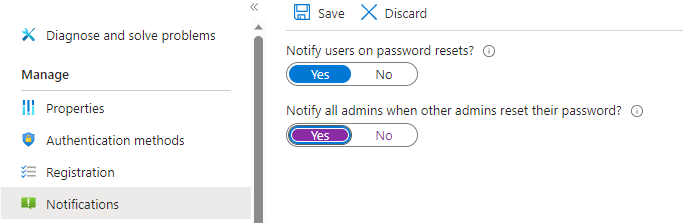
Next we set “Notifications”, we want to notify users when their password is reset, and we want all global admins to be notified when another admin resets their password. (This admin setting may not suit your environment, but we want to be alerted for admin password changes). We save our changes.
If we want to keep track of SSPR we can use the “Audit logs” menu item as shown below to display all SSPR logs or filter down to a more specific subset of SSPR information.

The last thing we will touch on regarding passwords in Azure is bulk password resets. You may end up in a situation where you need to quickly force a password reset for all users.
The available method depends on how many users require a password reset.
The below method is for only 40 users at a time.
Go to “https://admin.microsoft.com” > “Home” > “Active Users”.
From here you can select 40 users then using the three dots menu select “reset password”. You can do more than one batch of 40 users, but only 40 at a time.

For more than 40 user at a time where the previous method is not practical, check out this blog by MVP Vasil Michev which shows example PowerShell scripts.
I hope you found this usefull and now have a good understanding od passwords within Azure. In our next guide we will be looking at securing Privileged Access.
