

This guide is not going to go into why securing privileged access is so important. If you’re here for this guide, I’ll assume you understand its importance. This guide will not cover all the different privileged roles and what they should be used for, nor will we be covering the monitoring of privileged access in any detail as monitoring will be covered in a separate guide. We will be looking at how these accounts and their access should be secured.
This is also not a one size fits all, and there are many different ways to configure some of these settings, and achieve similar results. As with all these guides you need to think about your environment and whether some of the settings are appropriate.
This diagram from Microsoft relates to a recommended roadmap for securing privileged access. It’s important to understand that any secure configuration is a journey, you need to be realistic about the goals, and not think you can do it all in one attempt. The Microsoft roadmap breaks securing privileged access into four stages.

- Stage 1 (24-48 hours): Critical items that we recommend you do right away
- Stage 2 (2-4 weeks): Mitigate the most frequently used attack techniques
- Stage 3 (1-3 months): Build visibility and build full control of administrator activity
- Stage 4 (six months and beyond): Continue building defenses to further harden your security platform
We will also be referring to The “Technical Guide – Office 365 UK Blueprint – Secure Configuration Alignment” configurations for “Good”, “Better” and “Best” controls.
Before we move on let’s also mention the Microsoft Cloud Security Benchmark v1 which is the Microsoft-authored set of guidelines for security and compliance best practices based on common compliance frameworks such as the CIS controls and NIST. You can find the reference table for the framework here.
There is a section dedicated to Privileged Access which uses the referrence “PA” and includes the items below.
- PA-1: Separate and limit highly privileged/administrative users
- PA-2: Avoid standing access for user accounts and permissions
- PA-3: Manage lifecycle of identities and entitlements
- PA-4: Review and reconcile user access regularly
- PA-5: Set up emergency access
- PA-6: Use privileged access workstations
- PA-7: Follow just enough administration (least privilege) principle
- PA-8 Determine access process for cloud provider support
Most of these items will be covered below, however some will be covered in later guides. If you are working to address each of these eight areas you are definitely on the right path.
Privileged Access should never occur via a standard user account assigned with elevated privileges, for example administrators should have a standard user account which provides access to O365, and other productivity tools which could be named “janice.bing@yourdomain.com.” Privileged access should be provided by a separate account which then has privileged roles assigned to it which could be named “janice.bing.admin@yourdomain.com.” Privileged accounts should not be used for tasks such as internet browsing or opening emails, this should be done using the standard account, then when any admin task is required the privileged account would be used.
Privileged Identity Management (PIM) takes this one step further where the privileged account will have no pre-assigned permissions. An admin user would need to login with their privileged account and then request the required permissions to carry out the required task. This would need to be approved by a separate admin account, and would be time limited to hours, days or months dependant on the request, this is known as Just In Time (JIT) access management. This prevents any privilege creep as permissions are automatically stripped from accounts, and it also limits the impact of an admin account takeover as it is unikely the account will be overly provisioned and it would be more difficult to elevate the accounts current permission level. Microsoft recommends using Azure AD (Entra ID) Privileged Identity Management (PIM), however this requires Azure AD Premium P2 or EMS E5, which most orgs don’t have, and our test environment has the Business Premium licencing, which also does not include the required licencing, so we will not cover that here. PIM is fully explained in this microsoft documentation.
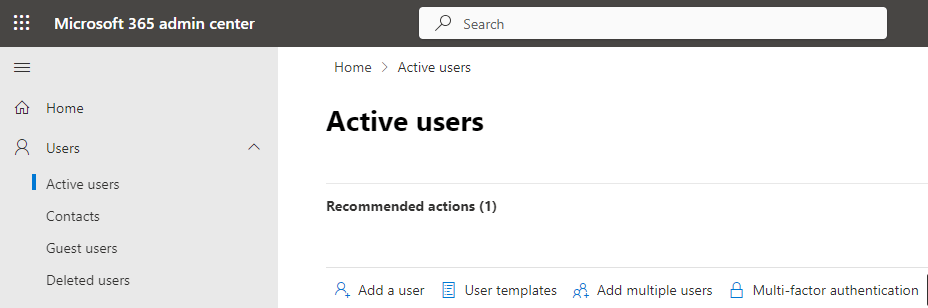
One of first things is to remove any O365 licencing from privileged accounts, as this goes some way to preventing the use of productivity tools with privileged accounts. We can check by going to https://admin.microsoft.com/ > Selecting “Users” > “Active Users” in the left hand menu.

From this list we can identify if any of our privileged accounts have licences.

Here we can see one of our admin accounts has a basic licence which we want to remove. This is easily done by clicking the user name, then from the sub menu which appears, untick the licence.

We also want to ensure that 2FA is enforced for all privileged accounts, and there are a number of ways we can do this.
NOTE: Microsoft recommends implementing passwordless for all privileged accounts after the accounts have had 2FA enforced and been used for a while. Configuring passwordless authentication will be covered in a later guide.
In 2019 Microsoft began enforcing security defaults, and if your tenant was created after October 22, 2019 then security defaults will already be enabled which includes default 2FA enforcement. If you are using the free version of Azure then security defaults are probably right for you and you should enable them (if they are not in use) using the security defaults guide.
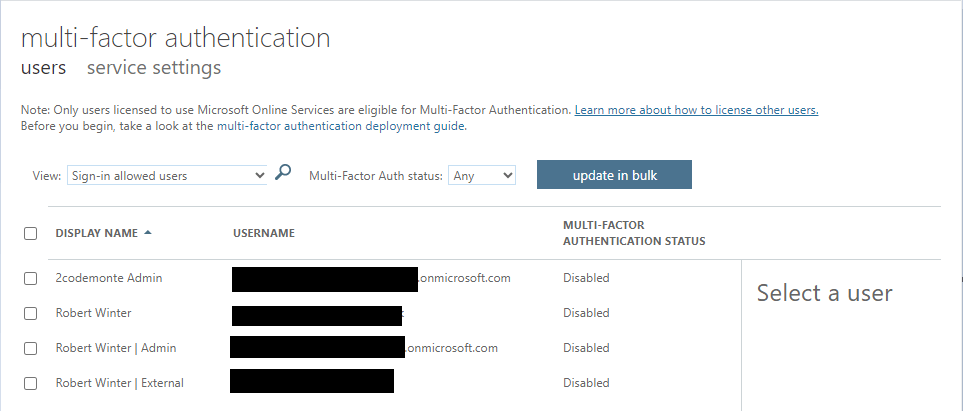
NOTE: You will need to check if your current privileged accounts are using legacy 2FA methods, if so you will need to disable this within the legacy portal before enabling security defauts. To access the legacy 2FA portal we go to https://admin.microsoft.com/ > Select “Users” > “Active Users” in the left hand menu
Then select “Multi-factor authentication” which will open up the legacy MFA page.
This page can also be accessed via https://portal.azure.com/, search for Azure AD in the search bar, then select it from the list.
Select “Users” from the left hand menu and leave “All users” selected then hit “Per-User MFA”. Here you will be able to search for user accounts which have per user 2FA enabled.
To check if security defaults are enabled for our tenant we go to https://portal.azure.com/, search for Azure AD in the search bar, then select it from the list.

Leave “Overview” selected in the left hand menu, then select “Properties” and scroll down to the bottom where you will see an icon which denotes whether security defaults are enabled.

Per user MFA is still supported via the legacy 2FA page shown above (but will be EOL as of September 2024), so if you do not want to use security defaults you can manually enable per user MFA. This creates issues as you are relying on whoever creates new accounts to remember to enable this for each new user account, but does give you the ability to set MFA for individual users.
This page can also be accessed via https://portal.azure.com/, search for Azure AD in the search bar, then select it from the list.
Select “Users” from the left hand menu and leave “All users” selected then hit “Per-User MFA”.
Simply select the user and configure it to enable under “quick steps”.

As we have mentioned previously we will be configuring Conditional Access Policies in a later guide so it will be not covered here. We will also be looking at enforcing admin access only being permitted from secure workstations to provide a further layer of protection, along with passwordless authentication
If you have Azure AD P2 licencing or an Entra ID Governance Licence, then you can create automated reports to help with the auditing of permissions and access across your tenant and services, however as we don’t have this, we will need to perform monthly audits of privileged accounts to ensure they are all still required and correct. We want to trend how many have been created and how many accounts have been assigned high level privileges. Log Analytic workspaces, and Azure Sentinel Workbooks can help us with this, so we’ll cover privileged account auditing in a future guide.
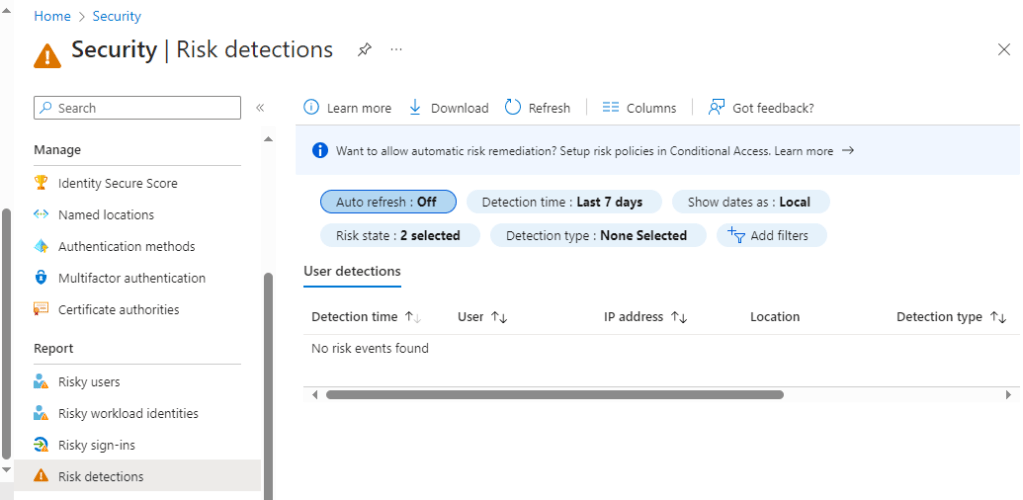
You should ensure you are checking the risky activities tab within Entra ID as if you see a privileged account in here alarms bells should be ringing, and you need to investigate immediately.
To view these alerts we go to https://entra.microsoft.com/ and from the left-hand menu select “Risky activities”.
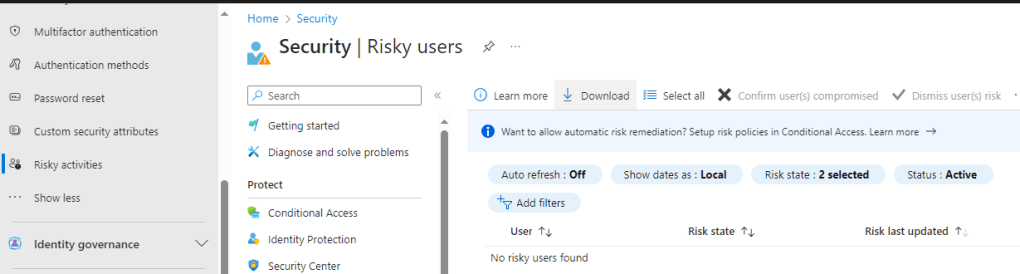
If you scroll down the submenu at the bottom you’ll see pages for Risky Users, Risky Workload Identities, Risky Sign Ins, and Risk Detections.
We can create automated risk remediation based on Conditional Access policies so anything you deem as critical can be immediately remediated using automation.
Another thing to remember is ideally there should be no more than four Global admin accounts regardless of the size of the organisation. You don’t need Global admin rights for business as usual activities (BAU), so you should be able to assign fewer privileges for day to day administration work.
Another important step is the monitoring and alerting for privileged accounts, we will be covering Microsoft Sentinel in a future guide. We can however use the Azure AD (Entra ID) portal to view our secure score, and view improvement recommendations made by Azure AD Security (Entra ID).
The recommendations you see in the portal align to the Microsoft Cloud Security Benchmark, which as previously highlighted is aligned to several industry best practice frameworks and standards.
Now although this is not technically securing privileged access we are going to take a quick look at implementing one of the recommendations from the Azure Security page.
Let’s go back to https://portal.azure.com search for “Security” and select the relevant icon to take us to the page shown below, and select “Identity Secure Score”.
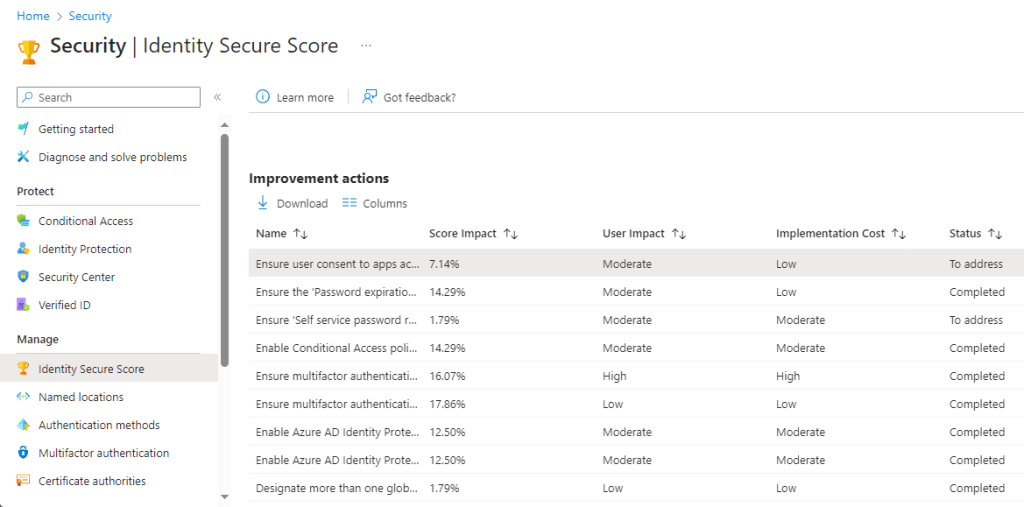
The status column is not shown by default so to view this select the “columns” icon and tick the box for “Status”. Let’s look at the top selection for us as it shows it needs addressing, so we click on the relevant line to bring up the details pane.

We have a read of the description and can even change the status manually if we wish. The options are shown below, and we can use this to show we are actively working on a recommendation, or if we want to accept the risk of this item as we cannot practically implement the remediation currently within our tenant.

If we scroll further down this pane we get step by step instructions on how to remediate this item, and an explanation of the exppected impact after the change.

Let’s follow the link and make this change as it definitely sounds like something we do not want standards users to be able to do unchecked. Following the link takes us to the below page.
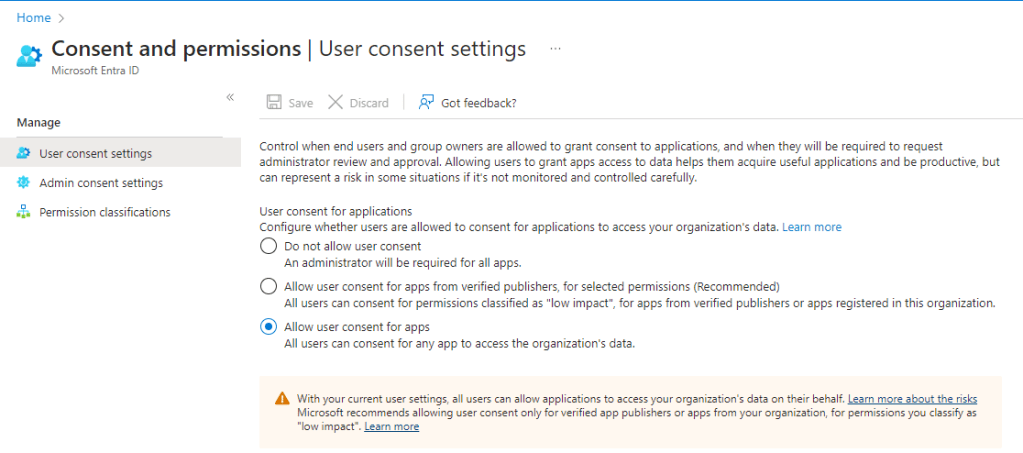
We are going to change both settings on this page so consent is required for all apps by a designated administrator.

We need to save this page and move to the “Admin consent settings” page. Here we will allocate either a group, role or name specific user accounts which are permitted to approve this requests, and the page tool tips also let us know the roles these approvers will need. Don’t forget to save your changes as these pages do not automatically save updates.

Let’s go have a look at our score based on the work we have already done and see what our score is. We access it by going to https://entra.microsoft.com/ and from the left-hand menu select “Risky activities” > “Identity Secure Score”. (Bear in mind that it can take 48 hours for the Indentity Secure Score to update, so the changes we just made will not yet be reflected in the score).

We’ll that’s been successful, a very decent score of over 90%. Not perfect, but don’t forget this is a maturity journey and we can’t solve everything within the first 6 months and we won’t necessarily ever have the full licencing required to receive a perfect score. We are looking to make the changes that return the biggest return for the most critical and likely threats.
Now, although this score is nice, we absolutely should not think this score is absolute, and a guarantee that our identities are adequately secured. We will cover further changes and improvements that can be made in future guides, and also cover tools which can help us test these controls.
We should quickly mention Customer Lockbox before we wrap up, as control “PA-8” from Microsoft’s Cloud Security Benchmark v1 is “Determine access process for cloud provider support”.
For us that could likely be Microsoft Azure support, so it’s important to know about Customer Lockbox. It allows us to Approve or Reject an access request made by the Microsoft Support engineers to access our data. If we give access by approving the request, Microsoft Support Engineers will be able to access the data to help resolve issues if they deem necessary.
We obviously want full control and visibility of any external support access to our cloud environment, especially as they will have privileged access and Lockbox can give us that.
Enabling it is easy, simply go to your Azure portal https://portal.azure.com and search for Customer Lockbox, select the option and it will bring up the following screen.

From this screen you will be able to review active requests and view activity logs from any Lockbox sessions, but first we need to enable it. Select “Administration from the left-hand menu and from this page you will be able to activate the feature, although you will need to be a global administrator.

And that’s it for now as far as securing privileged access, in the next guide we take what we have done so far and look at Conditional Access to take our protection one step further.
